Introduction to Client/Server Networking
|
A
computer network consists of two or more computers intended to share
resources:
|

A
client/server network is a system where one or more computers called clients
connect to a central computer named a server to share or use resources. Each
client computer must use an operating system that allows it to be identified to
participate in the network.
|
Client/Server Networking
|
A
computer network is referred to as client/server if (at least) one of the
computers is used to "serve" other computers referred to as
"clients". Besides the computers, other types of devices can be part
of the network:

In a
client/server environment, each computer still holds (or can still hold) its
(or some) resources and files. Other computers can also access the resources
stored in a computer, as in a peer-to-peer scenario. One of the particularities
of a client/server network is that the files and resources are centralized.
This means that a computer, the server, can hold them and other computers can
access them. Since the server is always ON, the client machines can access the
files and resources without caring whether a certain computer is ON.
One of
the consequences of a client/server network is that, if the server is turned
OFF, its resources and sometimes most of the resources on the network are not
available. In fact, one way to set up a client/server network is to have more
than one server. In this case, each server can play a different role.
Another
big advantage of a client/server network is that security is created, managed,
and can highly get enforced. To access the network, a person, called a user
must provide some credentials, such as a username and a password. If the
credentials are not valid, the user is prevented from accessing the network.
The
client/server type of network also provides many other advantages such as
centralized backup, Intranet capability, Internet monitoring, etc. In a small
network, all these services can be handled by one server:

In a
medium to large network, there can be many servers with each performing a
different task:

In these
series of lessons, we will build a Microsoft Windows network (I love Linux and
Apple but at the time of this writing, I want to make lessons simple by dealing
with only a simple network; normally, you can connect a Linux workstation, such
as Novell SUSE Linux, to a Microsoft Windows network; this is extremely easy to
do; based on my experience, there is nothing significant to do; once the
network is setup and you connect the Linux workstation to the network, the
Linux computer will find everything on the network; the Linux OS is so
intelligent it would take care of everything).
|
Client
Operating Systems
|
|
Introduction
|
If you
purchase new computers in a store or from a web store, the computers will most
likely have an operating system. At the time of this writing, most computers
sold in stores have Microsoft Windows 7 Home Premium. Some other computers,
such as netbooks, run Microsoft Windows 7 Starter.
For our
network, we will use Microsoft Windows 7 Professional, Ultimate, or Enterprise.
Microsoft Windows 7 Home Premium cannot join a domain-based network (but it can
participate in a peer-to-peer network). If the computer(s) you are planning to
use for your network doesn't (don't) have the Microsoft Windows 7 Professional,
Microsoft Windows 7 Ultimate, or Microsoft Windows 7 Enterprise operating
system, you must upgrade it. Among the ways you can acquire the upgrade, you
can purchase it from a computer store or a web store. Another option is to get
an MSDN subscription.
If you
have built your own computer(s) or you acquired (a) "barebone"
computer(s), once it's ready with the necessary hardware parts, you must
acquire and install the operating system.
A new
installation of operating system (OS) is suitable if:
- You have a
computer with no operating system at all
- You have a
computer with an operating system but you want to overwrite it
- You have a
computer with an operating system but it doesn't support an upgrade to the
OS you want to use
To
perform a new installation:
- Turn the
computer on. If you are using a computer without an operating system, if
you receive a message stating "Missing Operating System", or
"Strike F1 to retry boot, F2 for setup utility", don't worry
about it at this time
- On the (DVD)
drive, push the buton to open the drive
- Put the DVD that
has the operating system in the drive
- Restart the
computer
- A few seconds
after the computer has started, a message may (should) ask you to press
any key to boot from CD or DVD (to install the operating system) (the
message may display "Press any key to boot from CD or DVD" or
something like that). Press any key to continue. Otherwise:
- If a message of
pressing any key to install the operating system doesn't come up, you
should restart the computer. Then, as soon as the black screen of the
computer restarting appears, press a key such as F2 or F8 (this depends
on your computer or the manufacturer) to access the BIOS. Access the Boot
Sequence and check the list. If the (DVD) drive is not on top and if the
instructions allow it, move the (DVD) drive to the top of the sequence.
If you cannot move the (DVD) drive to the top, then disable the drives,
such as the hard drive, that come above it. In some cases, you can select
the drive and press the Space bar to remove the check mark from the
selected item. In this case, make sure that only the (DVD) drive has a
check mark next to it. After making changes in the BIOS to make the computer
boot from the (DVD) drive, save and exit the BIOS. Then restart the
computer and follow the instructions on the screen to install the
operating system
- If a message of
installation still doesn't come up, make sure the (DVD) drive is
installed appropriately (if you have access to the Internet, you can also
check the following site:http://www.bootdisk.com/ for a
boot disks and options)
- If the computer
still doesn't boot from the DVD and if you have access to the Internet,
check the Support site from Microsoft: http://support.microsoft.com
- The installation
will stall copying files.
The next screen will ask you to select the language. Select one:

- The next screen
presents the language you selected:

Click Next - The next screen
indicates that the installation is ready:

Click Install Now - The next screen
allows you to select the version (32 bits or 64 bits):

- Make your
selection and click Next
- The next screen
shows the license agreement:

Read it. If you agree, click "I accept the license terms" - Click Next
- If the computer
had an operating system already, the next screen allows you to upgrade or
perform a new installtion:

Click Custom (advanced) - The next screen
allows you to specify the partition where to install the operating system.
After making your selection, click Next.
The installation will start copying files. This may take a while

- When file
copying is over, the computer would reboot.
When the computer comes back on, a screen will ask you to provide a user name. Type it and press Tab.
You may be asked for a Product Key, which you must enter. After typing the product key, click Next - You must also
provide a name for the computer. Accept the default given name or change
it
- Click Next
- The next screen
asks you to optionally provide password. You can skip it for now (On a
small network, O personnally don#039;t provide that password). Otherwise,
type the password, press Tab, and type it again.
Click Next - The next screen
asks you to protect your computer:

Click the first option - The next screen
asks you to specify your Time Zone, the date and the time

- After making
your selections, click Next.
You should receive a welcome message that leads to the computer's desktop
|
Upgrading the Client
Operating System
|
At the
time of this writing, most computers sold in stores run Microsoft Windows 7
Home Premium. In fact, if you just go a computer store and decide to purchase
computers for your network, that's the operating system the computer may have.
If you
already have one (or more) computer(s) that you plan to use as workstation(s),
it (they) may be running a previous operating system such as Microsoft Windows
XP or Windows Vista. If you purchased a regular computer in a store, it may run
Microsoft Windows 7 Home Premium.
For our
network, we will use Microsoft Windows 7 Professional, Ultimate, or Enterprise.
Microsoft Windows 7 Home Premium cannot join a domain-based network (but it can
participate in a peer-to-peer network). If the computer(s) you are planning to
use for your network doesn't (don't) have one of those operating systems, you
should upgrade it. Among the ways you can acquire the upgrade, you can purchase
it from a computer store or a web store. Another option is to get an MSDN
subscription.
To
upgrade from Microsoft Windows 7 Home Premium to Microsoft Windows 7
Professional, Ultimate, or Enterprise:
- Start the
computer and access its desktop (if necessary, log in)
- Open the DVD
drive, insert the disc, and close the drive. A window titled AutoPlay
should come up

If this window doesn't come up, start Windows Explorer and access the DVD drive - Click Run
Setup.exe (from the AutoPlay window) or double-click setup (from Windows
Explorer)
- A security
dialog box titled User Account Control should come up, asking you whether
you will allow the installation to make changes to the computer. Read the
text and click Yes.
A window will come up, asking you to select the language the computer will use (this installation uses Microsoft Windows 7 Ultimate)
- Click the
desired language. Another window will come up to confirm the language you
selected:
- Click Next.
Another window comes up to indicate that the installation is ready to
start:
- Click Install
Now. The next dialog box would ask you to check the updates

- Click the option
to check updates.
The next dialog box allows you to select the type of platform you want to use 32 bits or 64 bits:
- Make your
selection and click Next.
The next dialog box presents the license agreement:
- Read it and, if
you agree, click the bottom check box. Otherwise, stop the installation
- If you agreed
with the license, click Next.
The next dialog box deals with existing files, if any:
- Two options are
presented to you:
- If you are
installing Microsoft Windows 7 Professions, if you have files in the
computer and you want to keep them, click Upgrade. If you don't care
about existing files, click the second option
- If you are
installing Microsoft Windows 7 Ultimate or Enterprise, you cannot upgrade
from Microsoft Windows 7 Home Premium. Therefore, you must click the
second option
The next option asks you to
specify the partion where you will install the operating system (OS)

- After selecting
(or creating and selecting) the partition, click Next.
If you had selected the option to install a new copy of the OS and if there are files already on the partition, a warning message box will inform you that the files will be moved to a folder named Windows.old. In this case, click OK.
The installation will start copying files:

This may take a while

The computer will reboot
- When the files
have been copied and the computer reboots, it will ask that you type a
user name and a name for the computer.
Type a user name, press Tab, and type a name for the computer - Click Next
- The next screen
asks you to provide a password for the user name you just entered. This is
not required, especially if you are creating a small network (I
personnally leave it empty).
After typing or not typing a password, click Next - The next screen
may ask you to type a product key. After typing it, click Next
- The next screen
asks you to protect your computer. In most cases, you should click Use
Recommended Settings
- The next screen
asks you to specify the Time Zone and the current time (and date) on the
computer.
After making the selections, click Next.
You should then receive a Welcome message and other messages, then the desktop appears
|
Server
Operating System Installation
|
A client
server network is a system where a computer named a server is used to provide
resources to other computers named clients. A server is a computer that can
participate in a client/server network to hold resources and items that other
computers would need:

A server
is primarily a regular computer. To create a client/server network, first
identify the computer that you will use as the server. You can use an existing
computer or purchase a new one. When planning the server, if you plan to use
one of your (existing) computers as the server, check its hardware and make
sure it meets the necessary hardware requirements.
If you
have a computer with no operating system because either you got/built it
("barebone") without an operating system or you bought a server that came
without an operating system (or you removed the operating system for example by
formatting the hard drive or you created two or more partitions on the hard
drive)), make sure it meets the necessary hardware requirements.
You will
also need a monitor attached to the server. If you will not work closely with
the server, that is, if you will not "watch" the server all day long,
the type of monitor you connect to it may not be important. A monitor that can
handle a 1024 x 768 resolution will be fine.
|
Server Operating System
|
As its
name implies, the role of a server is to serve. To perform this job, it must be
loaded with a special operating system (OS), such as Microsoft Windows Server
2008. That's the one we will use.
If you
already have a computer that has an operating system whose version is lower
than the one you want to use (Microsoft Windows Server 2008), you may have to
upgrade it. Otherwise, you may have to get the OS and install it. You may have
a computer with an operating system but that OS cannot be upgraded into
Microsoft Windows Server 2008.
To get an
operating system, you have many options:
- You can purchase
a computer that has the operating system already. In this case, if you
order the computer from a web store, you must indicate that you want it to
have the OS already, which would be installed by the manufacturer
- You can acquire
and install the OS. You can purchase the OS from the operating system
publisher (either buy the OS from Microsoft or purchase an MSDN
Subscription), from a software dealer, or a web store
To
install Microsoft Windows Server 2008:
- Start the
computer. You may receive a message stating that the operating system is
missing or something like that
- Open the DVD
drive
- Put the disc in
the drive, and close it
- Restart the computer.
You should receive a message stating Press Any Key To Boot From CD
or DVD
- Press any key to
start the installation.
(If your computer already has an operating system, start it. Open the DVD drive, put the DVD in it, and close its door. If the operating system cannot be upgraded, a message box and display and let you know) - At one time, a
window will come up, asking you to select the language. Click the desired
language, such as My Language is English

- The next screen
will display details of the selected language:

Click Next - Click Install
Now

- The next screen
will ask what version of the operating system you want to install. For our
example, we click Windows Server 2008 R2 Server Enterprise with Service
Pack 1

- To continue,
click Next
- The next screen
will show the Microsoft Software License Terms. Read it. Since it is long,
to navigate up and down, you can press Page Up or Page Down. After reading
it, if you accept the terms of the license, click I Accept The License
Terms

- Click Next.
If you don't like what it says, press ESC and stop the installation. - The next screen
asks you to upgrade or perform a new installation. For our example, we
will perform a new installation

- The next screen
asks you to select the partition you want to use to install the operating
system. In most cases, you should create partitions. For example, if you
have only one partition but it is large and you want to create various
partitions, click it to select it. Then, click New. A spin button
willdiplay, allowing you to decrease or manage the size(s) of the
partition(s). When you reach the desired size, click Apply. You can also
format a partition as necessary. If you do, make sure you use NTFS
- After creating
the partitions, select the partition you want to use

- Click Next


- The installation
will start copying files. This may take a while.
When the installation has finished copying the files, it will reboot - When the
computer reboots, it may display a message to Press Any Key to Boot From
CD or DVD. Don't press any key.
The installation will perform new operations about Completing Installation.
When it has finished Completing Installation, the computer may reboot.
The next screen asks you to set the administrator's password:

Click OK - Type the
password
- Press Tab to
access the other text box and type the same password

- Click the
right-pointing button or press Enter
- A message will
tell you that Your Password Has Been Changed.

Click OK - When asked to
login, press Ctrl + ALT + DELETE

- Enter the
password and press Enter
|
Introduction to Server
Configuration
|
When you
have finished installing Microsoft Windows Server 2008 R2, a window titled
Initial Configuration Tasks may come up:

The
Initial Configuration Tasks window is used to perform the most fundamental or
routine operations of Microsoft Windows Server 2008 R2. This window displays
when the computer starts. If you don't want to come up like that, click the
bottom check box. If it doesn't come up when the computer starts, to restore
this window, click Start -> Run, type oobe and press Enter.
After
installing the operating system, there are a few things you should (must) do
before continuing:
- You must make
sure the computer is connected to the Internet
- If this is the
first computer, you must make it a domain controller (this is not a
requirement if the computer will not be a domain controller; if you don't
(yet) know what a domain controller is, don't worry about that now)
|
The Server Name
|
Every
computer in the network must have a name. The installation gives a default name
that you can accept or change. Some installations, such as Small Business
Server, prompt you to accept or specify the name of the server. After
installing Microsoft Windows Server 2008, to check and/or change the name of
the server:
- In the Initial
Configuration Tasks window, click Provide Computer Name and Domain:

- Accept or change
the name of the server

- Click OK
- A dialog box
will ask you to restart your computer. Click OK

- Click Close
- Click Restart
Now
|
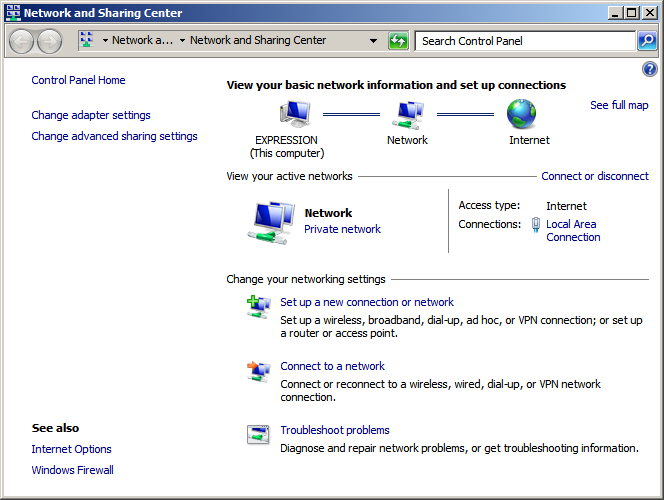
Network Discovery
|
Network
discovery makes it possible for a computer to allow other computers to
"see" it on the network. To take care of it on the server, start
Windows Explorer and click Network (you can click the Start button and click
the Network option). A message should appear under the toolbar stating
"Network discovery is turned off...":

Click
that message and click "Turn on network discovery and file sharing":

You
should receive a message box presenting you two options:

Click
"Yes, turn on network discovery...". If some computers are already
installed and connected to the same router, their names may appear in the
Network node in Windows Explorer.
|
Connecting the Server to
the Internet
|
Normally,
when you have fiinished installing the server, if everything went alright and
the computer is connected to a router, you should be connected to the Internet.
To test it, you can start the browser (Internet Explorer), set the address
to http://msdn.microsoft.com, and
press Enter.
|
Windows Updates
|
You
should make sure your installation of the operating system can regularly get
its updates from Microsoft. To take care of this, click Start -> All
Programs -> Windows Update. A windows will display, asking you to enable
automatic updates.
|
Assigning IP Addresses
|
Every
computer on the network needs an IP address so that other computers of the
network can locate it, just like every house needs a physical address so that
the post office and other people can find it.
A
computer has two main ways of getting an IP address:
- A server, called
DHCP server (the word "server" here represents an application;
it doesn't have to be a different server than the one you installed), can
automatically assign (provide) an IP address to each computer. This
solution is sometimes said to pose security problems
- You can manually
assign an IP address to each computer. Of course, you need to know a
little bit about something named TCP/IP, which means you would need to
know how to create and assign IP addresses
To assign
an IP address to a computer that runs Microsoft Windows 7, click Start ->
Computer (or click Control Panel). On the left, right-click Network and click
Properties. If you are using a laptop, click Wireless Network Connection. If
you are using a desktop, click Local Area Connection.
To assign
an IP address to a server (that runs Microsoft Windows Server 2008 R2):
- In the Initial
Configuration Tasks, click Configure Networking
- On the Taskbar,
click Start and click Network. In the left frame, right-click Network and
click Properties. Click Local Area Connection. In the Local Area
Connection Status dialog box, click Properties
The
following section is optional, especially if you are working on a small
network. To create the IP address for the server:
- Click Start
- Right-click
Network and click Properties

- Click Local Area
Connection
- Click Details.
Make note (on a piece of paper) of the address on the right side of IPv4
Address:

(For our example, we are building a small network and we will just use a small range of IP addresses. In the real world or for a large network, you would need to actually know TCP/IP, design a range of IP addresses you plan to use, then assign those IP addresses, or design a way to assign the IP addresses to the computers) - Click Close
- In the Local
Area Connection Status dialog box, click Properties
- In the checked
list box, click Internet Protocol Version 4 (TCP/IPv4)

- Click Properties
- Click Use the
Following IP Address
- Type the IP
address you want the server to use (for our example, and based on the
above dialog box, we type 192.168.001.102) and press Tab
- Type the subnet
mask (normally, it should be added automatically when you press Tab from
the previous IP address text box)
- Type the default
gateway address (use the first and the second octets of the IP address you
had provided (such as 192.168) and use 001.001 for the other two bytes)
- Provide the
Preferred DNS server address (we use 127.0.0.1 for our example) and the
Alternate DNS Server address (we leave ours empty)

- Click OK
- Click Close
- Click Close
No comments:
Post a Comment